Transportation Group - Instruction Manual
Introduction
This manual provides instructions on how to integrate with QuickBooks from our web portal and how to properly create and manage invoices in QuickBooks.
QuickBooks Integration
Our system integrates with QuickBooks to automatically pull customer data and invoices, which are then processed and converted into EDI 210 documents for electronic transmission to trading partners. This integration streamlines your billing workflow by eliminating manual data entry and ensuring accurate, timely invoice processing.
Setting Up the Integration
-
Navigate to the
Integrationspage in our web portal.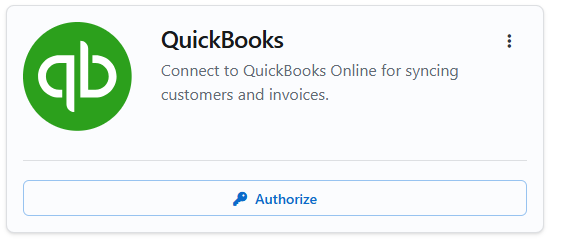
-
Click on the
Authorizebutton. -
You will be redirected to the QuickBooks authorization page.
-
Enter your QuickBooks credentials and approve the connection request.
-
After authorization, you will be redirected back to our web portal where you'll need to login again. Once logged in, you'll be returned to the
Integrationspage.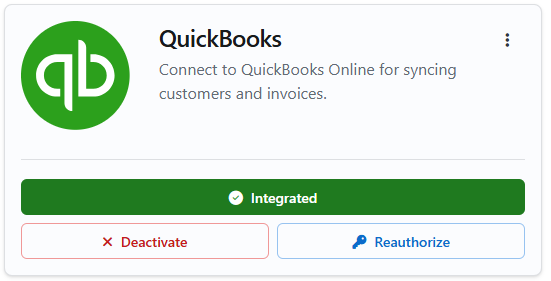
-
After successful integration, you will see the
Integratedstatus. You now have options toDeactivateorReauthorizethe integration as needed. -
Our system automatically syncs data with QuickBooks at regular intervals throughout the day. However, if you need to sync data immediately:
- Click on the menu icon (⋮) next to the QuickBooks integration
- Select
Resyncfrom the dropdown menu - This will manually trigger a data synchronization between our system and QuickBooks
Creating New Invoices from QuickBooks
Required CustomFields for Each Invoice
When creating invoices in QuickBooks, the following CustomFields must be filled out for proper processing:
| CustomField | Requirement | Description |
|---|---|---|
| P.O. Number | Mandatory | Enter the Purchase Order Number |
| Shipment ID | Mandatory | Enter the Shipment ID |
| SPS Ready | Mandatory | Enter "Y" when the invoice is ready to be processed |
IMPORTANT: Each invoice must reference only ONE shipment and ONE P.O. Number. Invoices containing multiple P.O. Numbers or multiple Shipment IDs cannot be processed in our system.
Required Standard Fields
In addition to the CustomFields above, make sure to fill out these standard QuickBooks fields:
- Ship Date: The date the shipment was sent (this is a standard QuickBooks field, not a CustomField)
Invoice Line Items with Charge Indicator Codes
For each line item on the invoice, the description field must follow this format:
[CHARGE CODE] Invoice line item description
Where:
[CHARGE CODE]is the standardized charge indicator code (see below)- Following text describes the specific service provided
- The description following the
[CHARGE CODE]must not exceed 340 characters
List of Used Charge Codes in Transportation
| Code | Description |
|---|---|
| BAS | Base Charge or Line Haul |
| DETO | Detention at Origin |
| DETD | Detention at Destination |
| DMC | Deadhead Mileage Charge |
| DTQ | Trailer Detention at loading |
| DTR | Trailer Detention at unloading |
| FSC | Fuel Surcharge |
| GST | GST |
| HAZ | Hazardous |
| HST | HST |
| LFT | Liftgate Charge |
| LOA | Lumper free |
| SOC | Stop off Charge |
| WAT | Waiting Time |
For a complete list of valid charge indicator codes and their descriptions, refer to the List of Charge Indicator Codes.
EDI Document Management
Our web portal provides comprehensive tools for managing EDI (Electronic Data Interchange) documents throughout the transportation process. This section explains how to review and manage load tenders, responses, status messages, and invoices.
Load Tenders (EDI 204)
-
Navigate to the Load Tenders page in the web portal.
-
Here you can view all received EDI 204 documents and filter the list by:
- Trading partner (EDI partner)
-
Email Notifications: You will receive email notifications when a new Load Tender (EDI 204) is received by the system and is ready to be reviewed.
-
From the table view, each load tender row has a menu with the following options:
- View: See all segments breakdown for the EDI 204 document
- Respond: Generate a response to the load tender
- Send Status Message: Create and send a status update for this shipment
-
To view detailed information about a load tender:
- Click the View option from the row menu
- This opens a detailed breakdown of all segments in the EDI 204
- You can see pickup and delivery information, commodity details, special requirements, etc.
Responses (EDI 990)
-
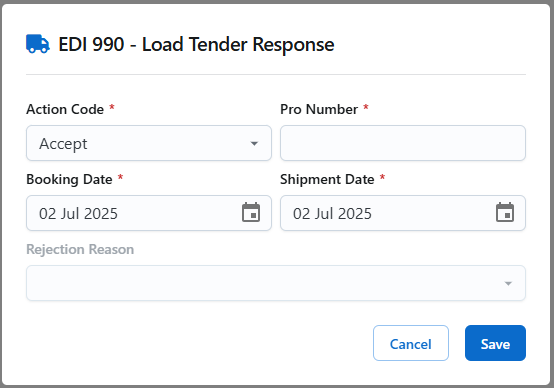
When you need to respond to a load tender:
- Find the load tender in the Load Tenders page
- Click the Respond option from the row menu
- Choose the appropriate action type (Accept/Reject)
- Select the rejection reason
- Add any necessary details
- Submit the response
-
Our system will automatically generate and send the corresponding EDI 990 response document to the trading partner.
-
To view your sent responses:
- Navigate to the Responses section in the Load Tender detail view.
- Here you can see all EDI 990 documents sent for this Load Tender.
- Check the status of each document (Sent/Acknowledged)
Status Updates (EDI 214)
-
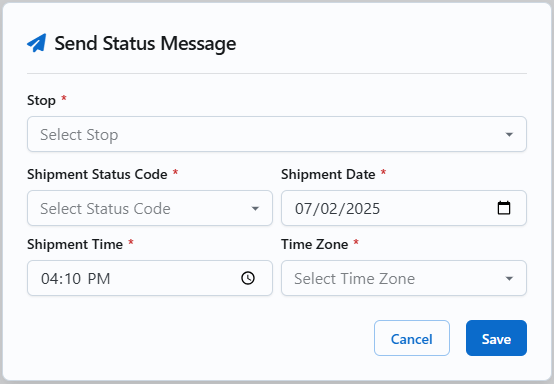
When you need to send a status update for a load tender:
- Find the load tender in the Load Tenders page
- Click the Send Status Message option from the row menu
- Choose the stop from the stops of the Load Tender the status message references
- Choose the appropriate shipment status code for the dropdown list
- Add any required details (date, time, and time zone)
- Submit the status message
-
Our system will automatically generate and send the corresponding EDI 214 document to the trading partner.
-
To view your sent status messages:
- Navigate to the Status Messages section in the Load Tender detail view
- Here you can see all EDI 214 documents sent for this Load Tender
- Check the status of each document (Sent/Acknowledged)
- View the full history of status updates for the shipment
EDI Invoices (EDI 210)
-
Navigate to the Invoices page in the web portal.
-
Here you can view all EDI 210 invoice documents and filter the list by:
- Trading partner (EDI partner)
- You can also search for a specific invoice using its invoice number
-
For each invoice, you can view:
- Complete invoice details
- All invoice line items with charge indicator codes
- Full invoice breakdown
- Current invoice status
EDI Invoice Status Types
There are three types of EDI Invoice statuses:
- Invoice Received: The invoice has been received from QuickBooks and is waiting to be sent via EDI to the trading partner.
- Invoice Sent: The invoice has been successfully sent via EDI to the trading partner.
- Missing or Invalid Fields: The P.O. Number or Shipment ID fields are missing and must be added by the user before the invoice can be sent via EDI.
Email Notifications
You will receive email notifications in the following scenarios:
- When an invoice status changes to "Invoice Sent via EDI"
- When an invoice status is "Missing or Invalid Fields"
Editing Invoice Information
Editing P.O. Number and Shipment ID:
- You can only modify the P.O. Number and Shipment ID when they are missing and the invoice status is "Missing or Invalid Fields"
- Navigate to the specific invoice from the Invoices page to make these changes
Editing Charge Indicator Codes:
- You can modify the charge indicator code for any invoice line item from within the Invoice page
- Our system does automatically map all EDI 210 charge indicator codes, so you could always double-check that the charge indicator code value for invoice line items
- Select the invoice line item you want to edit and update the charge indicator code as needed
Important: After updating any EDI invoice information (P.O. Number, Shipment ID, or charge indicator codes), the invoice will be resent via EDI even if its status was already "Sent"
Customer Management
The web portal allows you to manage customer information seamlessly between our system and QuickBooks.
Viewing and Managing Customers
- Navigate to the Customers section in the web portal.
- Here you can:
- View all customers pulled from QuickBooks
- See detailed customer information by company
- Filter and search for specific customers
Creating New Customers
-
In the Customers section, click the Add Customer button.
-
Complete all required fields in the customer information form:
- Company name
- Contact information
- Billing address
- Shipping address
- Tax information
- Payment terms
-
Click Save to create the new customer.
Updating Customer Information
- In the Customers section, locate the customer you wish to update.
- Click the Edit button next to the customer name.
- Update the necessary information.
- Click Save to update the customer record.
Customer Details by Company
- In the Customers section, select the Associated Companies tab.
- This view organizes customers by parent companies, allowing you to:
- See all locations/divisions for each company
- Manage relationships between different customer